Engrave plastic signs – Step-by-step with Trotec Ruby
Table of Contents
Engraving signs in two-tone plastic laminates – where a thin surface layer of one color is placed on top of a contrasting core – is a proven and effective method for creating clear and durable text or graphics. When the laser removes the surface layer, the core color is exposed, providing sharp contrast without the need for color fill.
In this guide we show a example of a complete workflow with Trotec's Ruby® software and a CO2 Speedy laser, where we start from plastic laminate as material. Step by step, we'll walk you through how to design, engrave, and cut a sign – including tips on material handling, settings, and how to quality-assured the result. The process is representative of many types of laser-cut signs, but the examples here are based specifically on plastic laminate.
Upptäck våra laser machines for sign making.
Step 1: Design and import sign motifs
Create the sign design
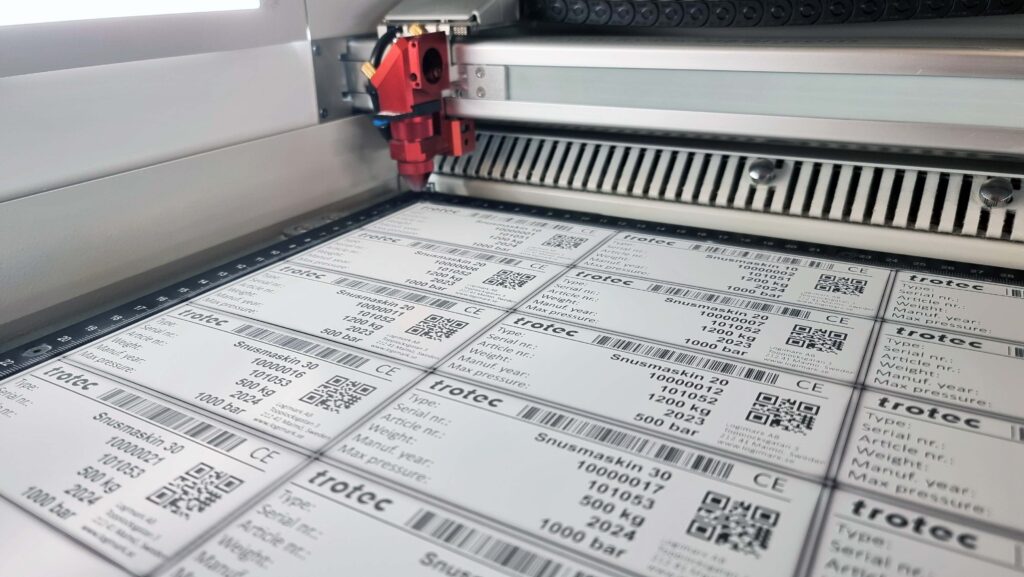
Start by creating the design of your sign. You can either use Ruby®'s built-in design features or design in an external program (e.g. CorelDraw, Adobe Illustrator) and then import the file into Ruby. Ruby supports importing common formats such as PDF, SVG, PNG, JPG, CDR, AI etc., eliminating the need to “print” the job via a driver. When producing signs with varying content, dynamic data is often used. In these cases, you can easily enter the information into an Excel sheet and import a CSV file directly into Ruby – an efficient way to manage multiple signs with unique content.
Plan engraving and cutting
In your design, you should clearly distinguish between the elements that are to be engraved and those that are to be cut out. For example, you can fill objects that are to be engraved with black or another color, while contour lines that are to be cut out are set as thin vectors (hair-thin lines) in a different color (a common convention is a red line for cutting). Trotec Ruby interprets separate colors as different “effects” in the material profile – e.g. black for engraving and red for cutting. Also add all relevant text (convert text to curves if you use external programs, so that no fonts are messed up when imported). At the same time, Ruby offers high flexibility – you can also load fonts directly into Ruby, which means that you do not always have to work in vector format.
Once your sign layout is complete, import it into Ruby (or if you designed directly in Ruby, skip to the next step). Save the design and click “Create jobs” (Create Job) to send it to Ruby®s prepare-view where the laser job is set up.
Step 2: Set up laser jobs and parameters in Ruby
In Ruby®s Preparescreen, you will now see your design placed on the work surface that corresponds to the laser bed. Here you can adjust the position, number of copies, etc. Place the design on the work surface according to how you will place the material in the machine – e.g. in the upper left corner if you are starting from that as the origin. If your machine has a camera function (some Speedy models) you can use it to align the design to the material visually; otherwise use the rulers and position indications.
Material selection
The next important step is to choose the right material profile in Ruby. In the right column you will find Material–menu – click there and select the corresponding material for your plastic laminate. Trotec usually has predefined parameters for its laminates (e.g. “TroLase 1,6 mm” if you are using 2-layer gravure plastic in that thickness). Be sure to select exactly the correct material type and thickness, as this will automatically load recommended power and speed settings optimized for that particular material. Ruby only allows one material per job, so if your design contains multiple materials, they must be managed as separate jobs.
Processing order
In the settings you can also enable “Inner geometry first” (Cut inner geometries first) so that any holes or inner contours are cut before the outer contour. This is important to maintain precision – for example, if the sign has mounting holes, you want to cut them before cutting the outer shape, so the sign doesn't move. Ruby also has a feature to avoid double-cutting overlapping lines (“Ship overlapping cutlines”), which can be useful if your design program has duplicated some lines.
Recommended settings and tips:
Once the material profile is selected, predefined parameters for each color layer in the design are displayed (e.g. engraving for black, cutting for red). You can use these directly, but it is wise to know some optimization tips for engraving laminates:
Resolution (DPI)
To achieve sharp and detailed results, an engraving resolution of around 500 dpi or higher is recommended. This provides a good balance between quality and production time – Trotec recommends around 500 dpi as standard, for example. In the “Quality” mode, around 600 dpi is used, while a faster “Speed” mode can be around 333 dpi. At lower resolutions, it is advantageous to adjust the focus slightly to get a wider focal point, which gives a softer and more even engraving.
Engraving direction
Select “Bottom-up”-engraving (engrave from the bottom up) if possible. This means that the laser head starts engraving from the bottom of the design and moves upwards, which reduces the risk of smoke and molten material being drawn over already engraved surfaces. Especially on laminates with a light core and dark surface, bottom-up helps to avoid discoloration of the light text.
Laser lens
Use one 2” lens for this job. A 2-inch lens provides a good combination of fine detail and enough depth of focus to cut through the material. (A 1,5" lens can produce slightly finer engraving but has a shorter depth of field; 2" is an excellent all-round choice for laminates.)
Air assistance
Mount it large air injection nozzle if you have one, which provides a weaker but wider air stream over the engraving surface. Too much Air Assist can cool the molten material too quickly and give a grayish tone to the engraving surface; a gentler air stream allows the engraving to maintain contrast while protecting the lens from dirt. (However, make sure that any air assist is on to blow away dust and avoid flames – weaker flow is sufficient for engraving.)
Power and speed – engraving:
The starting parameters in the Trotec material database are a good starting point. For a standard 80 W CO₂ laser, engraving of laminate typically around 60–90% effect and 100% speed (one pass) depending on quality vs. speed. Make sure the top layer is completely removed – if necessary, adjust the power slightly upwards in 5% increments if the engraving does not expose the core sufficiently. Normally, one pass is sufficient with the correct settings for TroLase materials.
Power and speed – cutting
For contour cutting of plastic laminate (approx. 1,6 mm thick) requires relatively low speed and high power. Trotec's guideline values for an 80 W laser are, for example, ~50-75% power at 1,0% speed (one pass) in quality mode, or 100% power at ~1,6% speed in fast mode, to cut through 1,6 mm acrylic-based laminate. These parameters can vary with laser power - a more powerful laser can cut faster. The PPI (pulse frequency) is typically 1000 Hz for acrylic-based materials for a smooth cut surface.
Focus shift (de-focus)
If your sign contains large engraving areas (e.g. wide filled shapes) it may be worth deliberately defocusing the laser slightly for smoother results. A Z offset of approx. +1 mm (focus slightly below the surface) can give a smoother engraving and increased contrast, especially with a light core. However, for very fine details (e.g. small text) you should engrave in sharp focus (0 mm offset) for maximum sharpness.
Quality vs. speed
Ruby often offers two sets of parameters – “Quality” and "Speed". The Quality settings provide higher detail and contrast and are preferred for fine sign engraving, while the Speed settings can be used if faster production is more important than maximum detail. You can choose what suits the job – for example, for a small information sign with fine text, Quality is recommended.
Once you have adjusted everything as above, you have basically prepared the job. Double check that the correct color layer has been assigned the correct laser parameter (look at the list of “effects”/layers in the material settings in Ruby – for example, black should be listed as “Engraving” and red as “Cutting” with associated values). Deactivate any effects that should not be run (uncheck any layers that are “unassigned” if they appear). Now it’s time to go to the machine itself and prepare the material.
Step 3: Material preparation and assembly in the laser
Before starting the laser job, the material must be correctly mounted in the machine. Follow these guidelines for safe and optimized results:
Worktable and fixation
Please use one lattice table – Trotec recommends aluminum or acrylic grid tables for laminates. These both facilitate engraving (through vacuum/vacuum) and provide clean cut surfaces when cutting. If your machine has a vacuum table or extraction through the table, cover the open areas of the table around the material (e.g. with paper or acrylic sheets) to increase the suction force under the material. This helps to flatten and fix the plastic laminate during engraving. If there is no vacuum, you can tape the edges or use magnets (if your table is magnetic) to keep the material flat.
Protective film
Most engraving plastics come with a thin protective film on the surface. Remove the protective film before laser engraving to avoid it melting or causing poor engraving quality. If possible in your application, however, leave the protective film on during contour cuttingThe film then protects the surface from smoke around the cut surfaces, which reduces the need for cleaning.
Positioning
Place the sheet of material on the laser bed in the position that corresponds to the layout in Ruby. For example, if you placed the design at the top left corner of the workspace in Ruby, place the material against the top left corner of the physical table (or use the machine's positioning laser if available to align). Make sure the material is flat against the table (no visible gaps).
Focusing
Set the laser to the correct focus distance. Use the focusing stick/automatic that comes with your machine to focus precisely on the surface of the material. Correct focus is critical for both cutting depth and engraving sharpness. (If you have planned a Z-offset in the software, e.g. +1 mm defocus for engraving, you should still focus normally on the surface – Ruby will automatically adjust the height during the engraving step).
Laser head and optics
Check that right lens is mounted (2” as mentioned above). Wipe the lens/mirror if there is dirt – clean optics give better results.
Air and ventilation
Start the extraction system (ventilation) and ensure that the dampers/valves are open for full effect. Good ventilation is important to evacuate the smoke and dust generated. Set air assist (the air blowing) on On with low or medium strength. As mentioned, we prefer to use the large nozzle for diffused air. This provides sufficient cooling and blowing away particles without destroying the engraving. (If you only have the standard nozzle, you may be able to lower the air pressure slightly if your machine allows it – but don't turn off the air completely unless you have to, as this will cause more soot and smudges, and you will have to keep an extra eye on the lens.)
Security check
Make sure the machine cover is working (safety switch, etc.), that the material is not in the way of anything (e.g. laser head movement). Remove any flammable objects.
Once everything is mounted, focused and set up as above, you are ready to start the laser process in Ruby.
Step 4: Laser engraving the sign
Return to Ruby®s Preparation/Productionscreen and start the laser job. You can either press “Send to queue” and then start the job via the machine's panel, or use “Start now”button (depending on Ruby version and machine connection). The laser will first perform engravings of the sign (raster engraving), followed by contour cutting. Keep an eye on the engraving process as it begins – confirm that the laser focus and settings appear to produce a clean engraving.
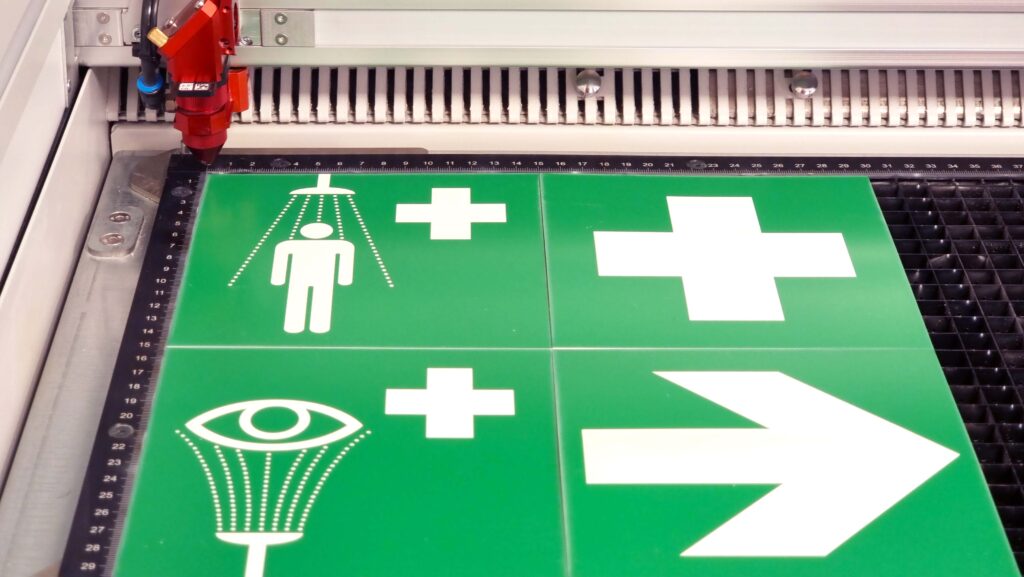
During the engraving process, the laser will quickly remove the thin top layer of the laminate according to your design. The result is that the text/graphics appear in the color of the core against the background color. “The fastest and most efficient method of producing signs is to remove the top layer to expose the color of the carrier material through a simple engraving process.” – which we are now seeing in practice. The advantage of these engraving plastics is that the motif appears immediately in a contrasting color and normally no manual filling or similar is needed afterwards.
Let the engraving complete without interruption. Do not open the lid during engraving. Thanks to the settings we have chosen, the surface should remain relatively clean; bottom-up-direction causes smoke to be drawn back towards the exhaust instead of passing over newly engraved details. If you have a light core (e.g. white text) and a dark topcoat, you may notice that the text becomes clean and white because the soot has not had time to settle into the engraving. If, after all, some paint residue is visible at the bottom of the engraving, this can be remedied later by cleaning, but usually the parameters are sufficient. In exceptional cases, if the top layer has not been completely removed (e.g. if you see thin films remaining in engraved areas), you can pause and run a extra engraving pass over the same subject. Then double-check the settings – you may need slightly higher power or lower speed. But as mentioned, usually TroLase laminates get good with a single engraving pass if the parameters are correct.
Tips for extra white and clear engraving
For the absolute best whiteness on e.g. white text against a dark background, you can experiment with increasing the effect slightly or doing a quick second engraving pass. Some experienced users also recommend engraving with a small defocus (e.g. +1 mm) to get a slightly thicker engraving beam – this can give a smoother bottom and an even whiter appearance. The disadvantage is that you lose some sharpness at the edges, so use it mainly for larger filled areas rather than fine text.
Once the engraving step is complete, Ruby/the machine will automatically move on to the cutting step (without you having to do anything). Stay and monitor the process during the next step as well.
Step 5: Contour cutting of the sign
After engraving, the laser now focuses on vector cutting of the sign's contours (and any holes). Since we activated “inner geometry first”, the machine first cuts out any inner details/holes, and last the outer contour. This ensures that the sign does not come off the material before all the details are cut. The laser follows the red lines (or whatever you defined as the cutting color) exactly according to the design. The cutting speed is low, so for longer contours this step may take a little while – be patient and let the machine work through the entire cutting sequence.
Keep an eye on the cut: you should see the laser beam pass through the material and a red/orange dot of light appear under the table. Normally, the laminate burns or flares very little when set up correctly, but if you see flames, be prepared to pause or adjust the air assist. A few sparks may occur if there is dirt in the cut line, but generally acrylic-based laminate cuts cleanly. Thanks to the airflow and extraction, smoke is carried down/away, which reduces soot on the edges. If the protective film was left on during the cut, the surface is further protected from any smoke. (In our case, we removed the film before engraving, so the surface is exposed – but the short time it takes to cut the contour usually does not cause significant dirt, especially with good extraction.)
When the laser cutting is complete, the machine will stop. Wait a few extra seconds to allow any smoke to escape. Then open the machine lid carefully. Be careful not to let small cut-out parts fall into the machine – if the vacuum is still on they may remain in place, otherwise they may have fallen into the grid table. Carefully pick out the cut-out sign and loose pieces. Warning: The parts may be hot immediately after laser processing, so do not burn yourself. Let them cool down if they are very hot.
You now have the finished cut sign(s) and any leftover pieces of material. Remove the remaining material from the machine to facilitate cleaning and collection of small parts. Turn off the exhaust/ventilation when you are finished cutting.
Step 6: Finishing and cleaning
Now there's a little bit left afterwork for the sign to be completely ready for delivery or use. The advantage of the laser process is that it usually requires minimal post-processing, but the following steps ensure a professional result:
Removing protective film/tape
If there is any protective film or masking left on the front or back, carefully peel it off. In our scenario, the front film was removed before engraving, but if you left film on during cutting, now remove the pieces of film that covered the sign and its cut-out parts.
Cleaning the engraved surface
Wipe the front of the sign with a slightly damp soft cloth to remove any dust or soot from engraving and cutting. This is usually sufficient as plastic laminates do not soot much if the parameters were correct. If there is still stubborn residue (e.g. some sticky dirt or paint residue on a light core), use a mild alcohol-free cleanser. (Alcohol-free is recommended to avoid the risk of matting the surface; however, Trotec laminates are quite durable, so window cleaner or isopropanol will also work if necessary – just avoid strong solvents and abrasive cleaners that can scratch the surface.)
Cleaning edges
The cut surfaces of acrylic-based engraving plastic can sometimes be a little sticky right after cutting, due to the melted acrylic. A trick to remove the stickiness and any dust on the edge is to “dab” the edges with a piece of masking tape (press the tape against the edge and pull away, the dirt will stick) You can also use a special cleaner for acrylic, e.g. Trotec's “Ultra Clean”, on the edges. Also check the back of the sign – sometimes a little dust can stick there too – wipe if necessary.
Mounting of fastening device
Depending on how the sign(s) will be used, you may need to mount something. If the laminate you used has an adhesive backing (some varieties, such as TroLase ADA, can be purchased with adhesive), remove the protective paper from the backing to expose the adhesive. Otherwise, you can now apply double-sided tape or other mounting tape on the back if the sign is to be attached to a surface. If necessary, you can also provide the sign with screw holes, spacers or suspension - if you planned such holes in the design, they are already laser cut; if not, you can carefully drill small holes (but be aware that drilling can crack acrylic, so laser is preferred for holes).
Other follow-up checks
If the sign consists of multiple parts (for example, a base plate and cut-out letters to be glued on top, in cases where you designed a multi-layer arrangement), organize the parts and glue/assemble according to plan. This guide focuses on a simple two-color sign, but similar principles apply to more complex builds. Make sure no parts are missing and that everything fits.
Once the sign is cleaned and mounted, it is ready for final quality control.
Need help?
If you have questions about settings, material selection or how to optimize your laser work in practice – do not hesitate to contact us. We are happy to help you with support regarding both machine, software and applications.